Any excuse to build something: A receipt printer
Back in May, at work, we were reviewing our experiences over the past two weeks. What’s been going well, what hasn’t, resources we need and our focus over the next two weeks. One of my co-workers joked about spending our team building budget on a joint project, this being a receipt printer that will print out our Github activity. Credit to Andrew Schmelyun for original idea, who’s writeup on the idea can be found here. I thought this was very funny little project to work on.
The Receipt Printer
I tried to find an old Epson receipt printer like the one used in the YouTube video however these proved too difficult to find for cheap. They also raised another issue where many did not have a USB interface, using rj11 or serial interfaces. Although this would have been more fun to work with, for simplicity’s sake I preferred one with a USB interface. I intended to run it off a raspberry pi zero W as I have many spares from previous IoT projects. Pi Zero’s are almost not powerful enough to do many web tasks these days however their small form factor makes it easier to integrate into a design without taking up too much space.
I found a small receipt printer, I originally wanted a 80mm wide printer but settled for 58mm as it was considerably cheaper. Many of these cheaper knockoff receipt printers from China use or emulate the same drivers and protocols as the Epson receipt printers. Printer drivers can be used to interface with these receipt printers, using drivers found automatically using CUPS or using drivers on the manufacture’s website. Since the main target of receipt printer is for POS system, drivers mainly support windows with little out-of-the-box Linux drivers to use. No matter, drivers are not required to interface with this receipt printer.
Interfacing with the receipt printers
One of the cool things about devices in linux, is that devices are treated as files, as are most things in linux. What this means is that given the write permissions to a file (or device), we can send data to the device. Now, if the device requires the data to be encoded in some way or turned into binary, we have to deal with that. However, Epson-like receipt printers are happy to receive just plain text and print it out directly. There are commands you can send to the printer for formatting, but to keep it simple, al we want to send it text and newlines. From the comman line we can echo to the device. Since this printer is connected over usb, we can find the device under /dev/usb/lp0 (this was the only usb device connected to the pi so it was fairly easy to find the correct device).
sudo bash -c 'echo "I love me a receipt printer" > /dev/ls/lp0'
That command is all we need to connect to the printer
The software
I wanted to emulate the original idea of connecting to GitHub and printing out issues. Since we really don’t use issues, I have setup my GitHub webhook to send only commits and pull requests. GitHub webhooks allow us to provide an address to a webhook (in this case our raspberry pi) and we can receive GitHub events containing the commit and pull request information when these actions are made. I wrote a small express app using an example I found online and made the formatting.
I also wanted to add my own style of way of interfacing with this receipt printer. I really like using bots as a method of interfacing with software, also given my experience with making bots, I decided to make telegram bot that will receive messages and print them out. I used telegram for bots since I already use the platform for communicating and connecting to my existing bots for my 3d printer and Tixel bot. It’s also super easy to make a bot on.
Both these bots run as a systemd services and startup on boot. The code for these can be found at the bottom of this post.
Ngrok
The Raspberry Pi Zero will be connected to my office’s guest WiFi. To enable GitHub to access my webhook, I need to expose it to the internet. Ngrok, a reverse tunnelling service, is ideal for low-frequency, low-data IoT tasks where network control is lacking. Ngrok offers a HTTPS endpoint that links to an exposed port on the machine, port 80 in this case, and provides a unique subdomain accessible from anywhere. Additionally, I utilised Ngrok to establish an endpoint for an SSH connection, allowing me to connect to the Raspberry Pi and code the software. Guest WiFi typically restricts connections to adjacent devices on the same network, as it should.
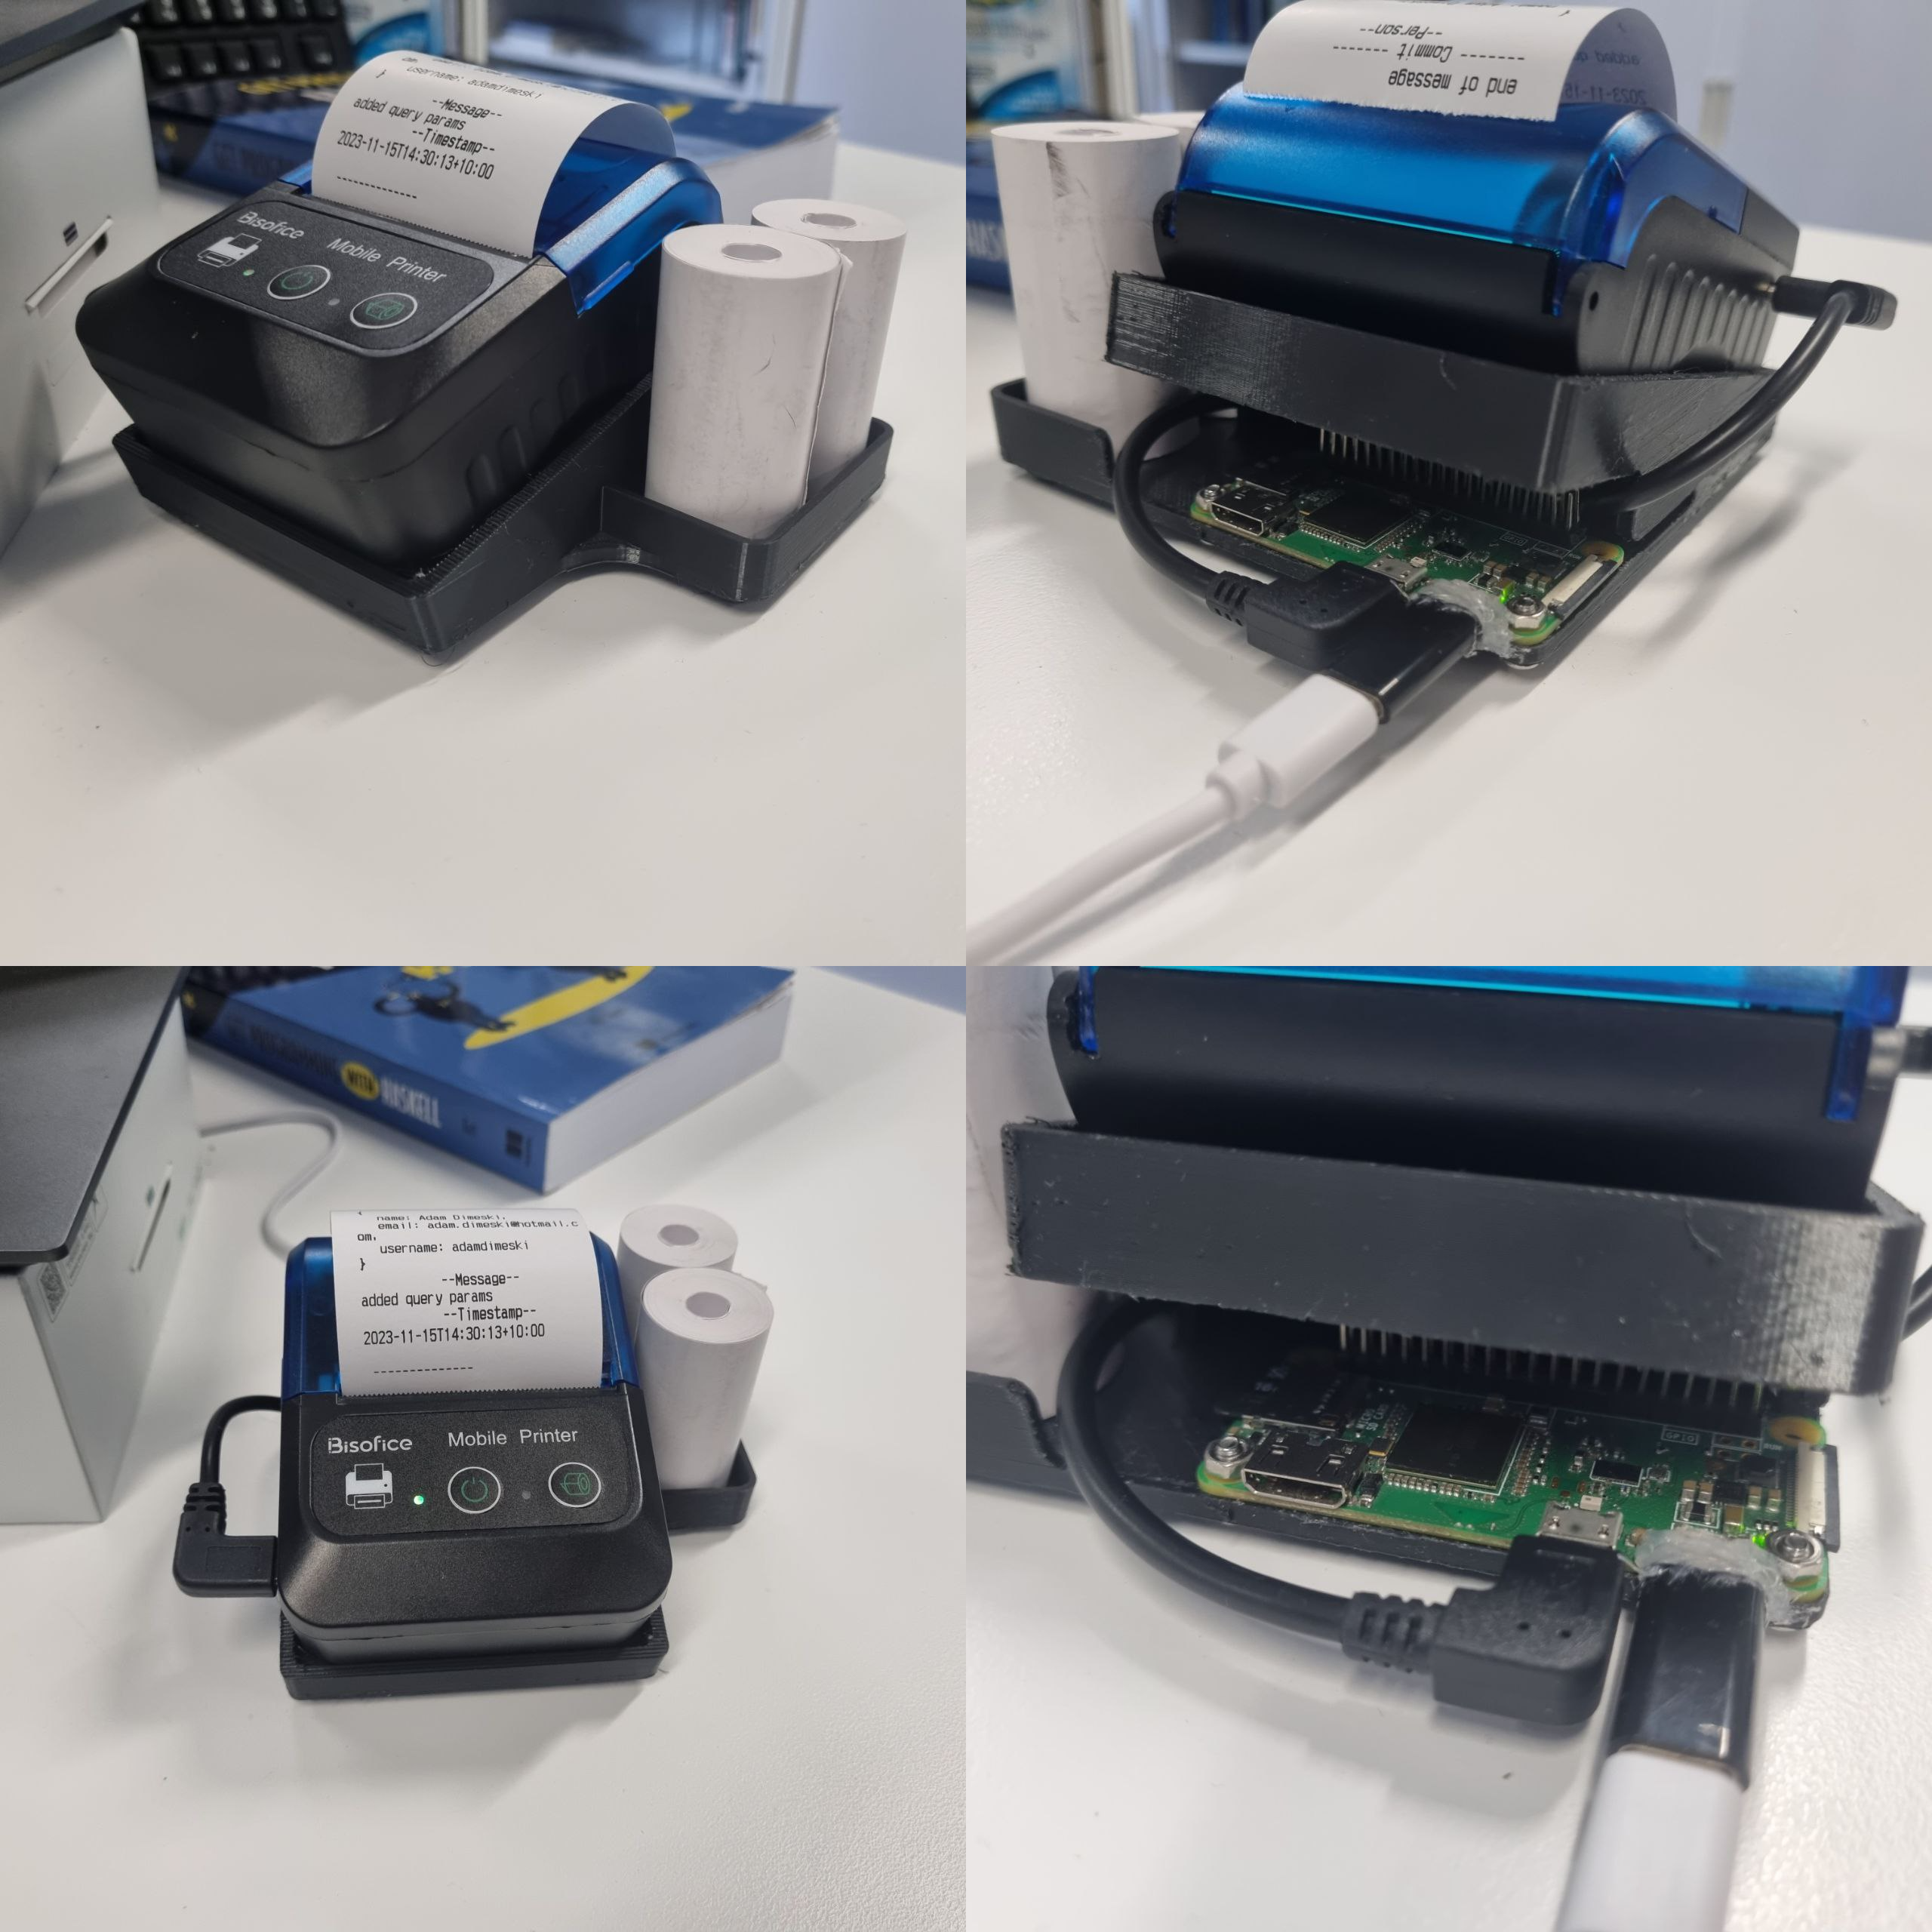
Designing a stand
I wanted to design a sleek setup that would neatly hold both the Raspberry Pi and the receipt printer while eliminating the desk spaghetti of cables that usually accompany any IoT project. I also wanted to minimise risk of accidentally unplugging a cable and take up the least amount of desk space. Given the compact size of the Raspberry Pi Zero, I opted for an elevated stand, positioning the Pi beneath it. This not only conceals the Pi behind the receipt printer but also makes it easy to access the power, data ports, and SD card
I also added a ledge on the right to store two extra thermal paper rolls. There wasn’t an idea ideal placement of the stand when 3d-printing that would minimise the support material or make it easy to remove. I therefore just printed it from bottom to top as this use the least amount of material. As a finishing touch, I crafted rubber feet using TPU to ensure that the stand sits comfortably on my work desk without leaving a scratch.
Summary
This was a fun little project that didn’t take much time to do. I made some other changes such as de-soldering the buzzer since it makes a loud piercing sound on startup and continuous beeping if the paper runs out. I did not want to this to be distracting in the office. It may be small, but it was fun to mix a bit of software with an off-the-shelf gadget and wrap it all up in a 3D-printed stand.
Code
App.js: Github Webhook
const { exec } = require("child_process");
var express = require('express');
var app = express();
app.use(express.json());
app.use(express.urlencoded({ extended: true }));

const port = 80;

app.all('/*', function (req, res) {
   console.log("-------------- New Request --------------");
   //console.log("Headers:"+ JSON.stringify(req.headers, null, 3));
   //console.log("Body:"+ JSON.stringify(req.body, null, 3));
   console.log(req.body.hasOwnProperty("commits"))
   if (req.body.hasOwnProperty("commits") == true) {
     var commit = req.body.commits[0];
     var person = commit.committer;
     var msg = commit.message;
     var timestamp = commit.timestamp;
     var payload = " ------- Commit ------- \n           --Person--\n\n" +
      JSON.stringify(person, null, 3) + "\n           --Message-- \n" +
      JSON.stringify(msg, null, 3) + "\n           --Timestamp-- \n" +
      JSON.stringify(timestamp, null, 3) + "\n\n --------------";
   } else if (req.body.hasOwnProperty("pull_request") == true) {
     var pr = req.body.pull_request;
     var person = pr.user.login;
     var state = pr.state;
     var title = pr.title;
     var msg = pr.body;
     var timestamp = pr.updated_at;
     var payload = " ------- Pull Request ------- \n           --Title--\n\n" +
      JSON.stringify(title, null, 3)  + "\n           --Person-- \n" +
      JSON.stringify(person, null, 3)  + "\n           --Status-- \n" +
      JSON.stringify(state, null, 3) + "\n           --Message-- \n" +
      JSON.stringify(msg, null, 3) + "\n           --Timestamp-- \n" +
      JSON.stringify(timestamp, null, 3) + "\n\n --------------";
   }
   else {
     var payload = "Undefined github webhook";
   }

   console.log(payload)
   var a = (payload + '\n\n end of message').split(/\r?\n/)
   for (let i = 0; i < a.length; i++) {
      exec("sudo bash -c " +  "'" + 'echo "' + a[i] + ' "' +  " > /dev/usb/lp0'");
   }
   res.json({ message: "Thank you for the message" });
})

app.listen(port, function () {
   console.log(`Example app listening at ${port}`)
})
App.py: Python Telegram Bot
from telegram import Update
import logging
import os
import subprocess
import time
from telegram import ForceReply, Update

from telegram.ext import Application, CommandHandler, ContextTypes, MessageHandler, filters
bot_token = '6614034463:AAE_ChXeKv4rPmv8X1Tv_WAIuk20Kfj_tFU'
# Enable logging
logging.basicConfig(
    format="%(asctime)s - %(name)s - %(levelname)s - %(message)s", level=logging.INFO
)
# set higher logging level for httpx to avoid all GET and POST requests being logged
logging.getLogger("httpx").setLevel(logging.WARNING)
logger = logging.getLogger(__name__)
# Define a few command handlers. These usually take the two arguments update and
# context.

async def start(update: Update, context: ContextTypes.DEFAULT_TYPE) -> None:
    """Send a message when the command /start is issued."""
    user = update.effective_user
    await update.message.reply_html(
        rf"Hi {user.mention_html()}!",
        reply_markup=ForceReply(selective=True),

    )
async def help_command(update: Update, context: ContextTypes.DEFAULT_TYPE) -> None:
    """Send a message when the command /help is issued."""
    await update.message.reply_text("Help!")

async def echo(update: Update, context: ContextTypes.DEFAULT_TYPE) -> None:
    """Echo the user message."""
    user_message = update.message.text
    msg = user_message + "\n"
    print(msg.splitlines())
    for line in msg.splitlines():
        p = os.popen("sudo bash -c 'echo " + '"' + line + '"' + "' > /dev/usb/lp0")
        time.sleep(0.2)
    os.popen("sudo bash -c 'echo -e " + '"' + "\n\n end of message" + '"' + "' > /dev/usb/lp0")
    await update.message.reply_text("messaged received")

def main() -> None:
    """Start the bot."""
    # Create the Application and pass it your bot's token.
    application = Application.builder().token(bot_token).build()
    # on different commands - answer in Telegram
    application.add_handler(CommandHandler("start", start))
    application.add_handler(CommandHandler("help", help_command))
    # on non command i.e message - echo the message on Telegram
    application.add_handler(MessageHandler(filters.TEXT & ~filters.COMMAND, echo))
    # Run the bot until the user presses Ctrl-C
    application.run_polling(allowed_updates=Update.ALL_TYPES)

if __name__ == "__main__":
    main()